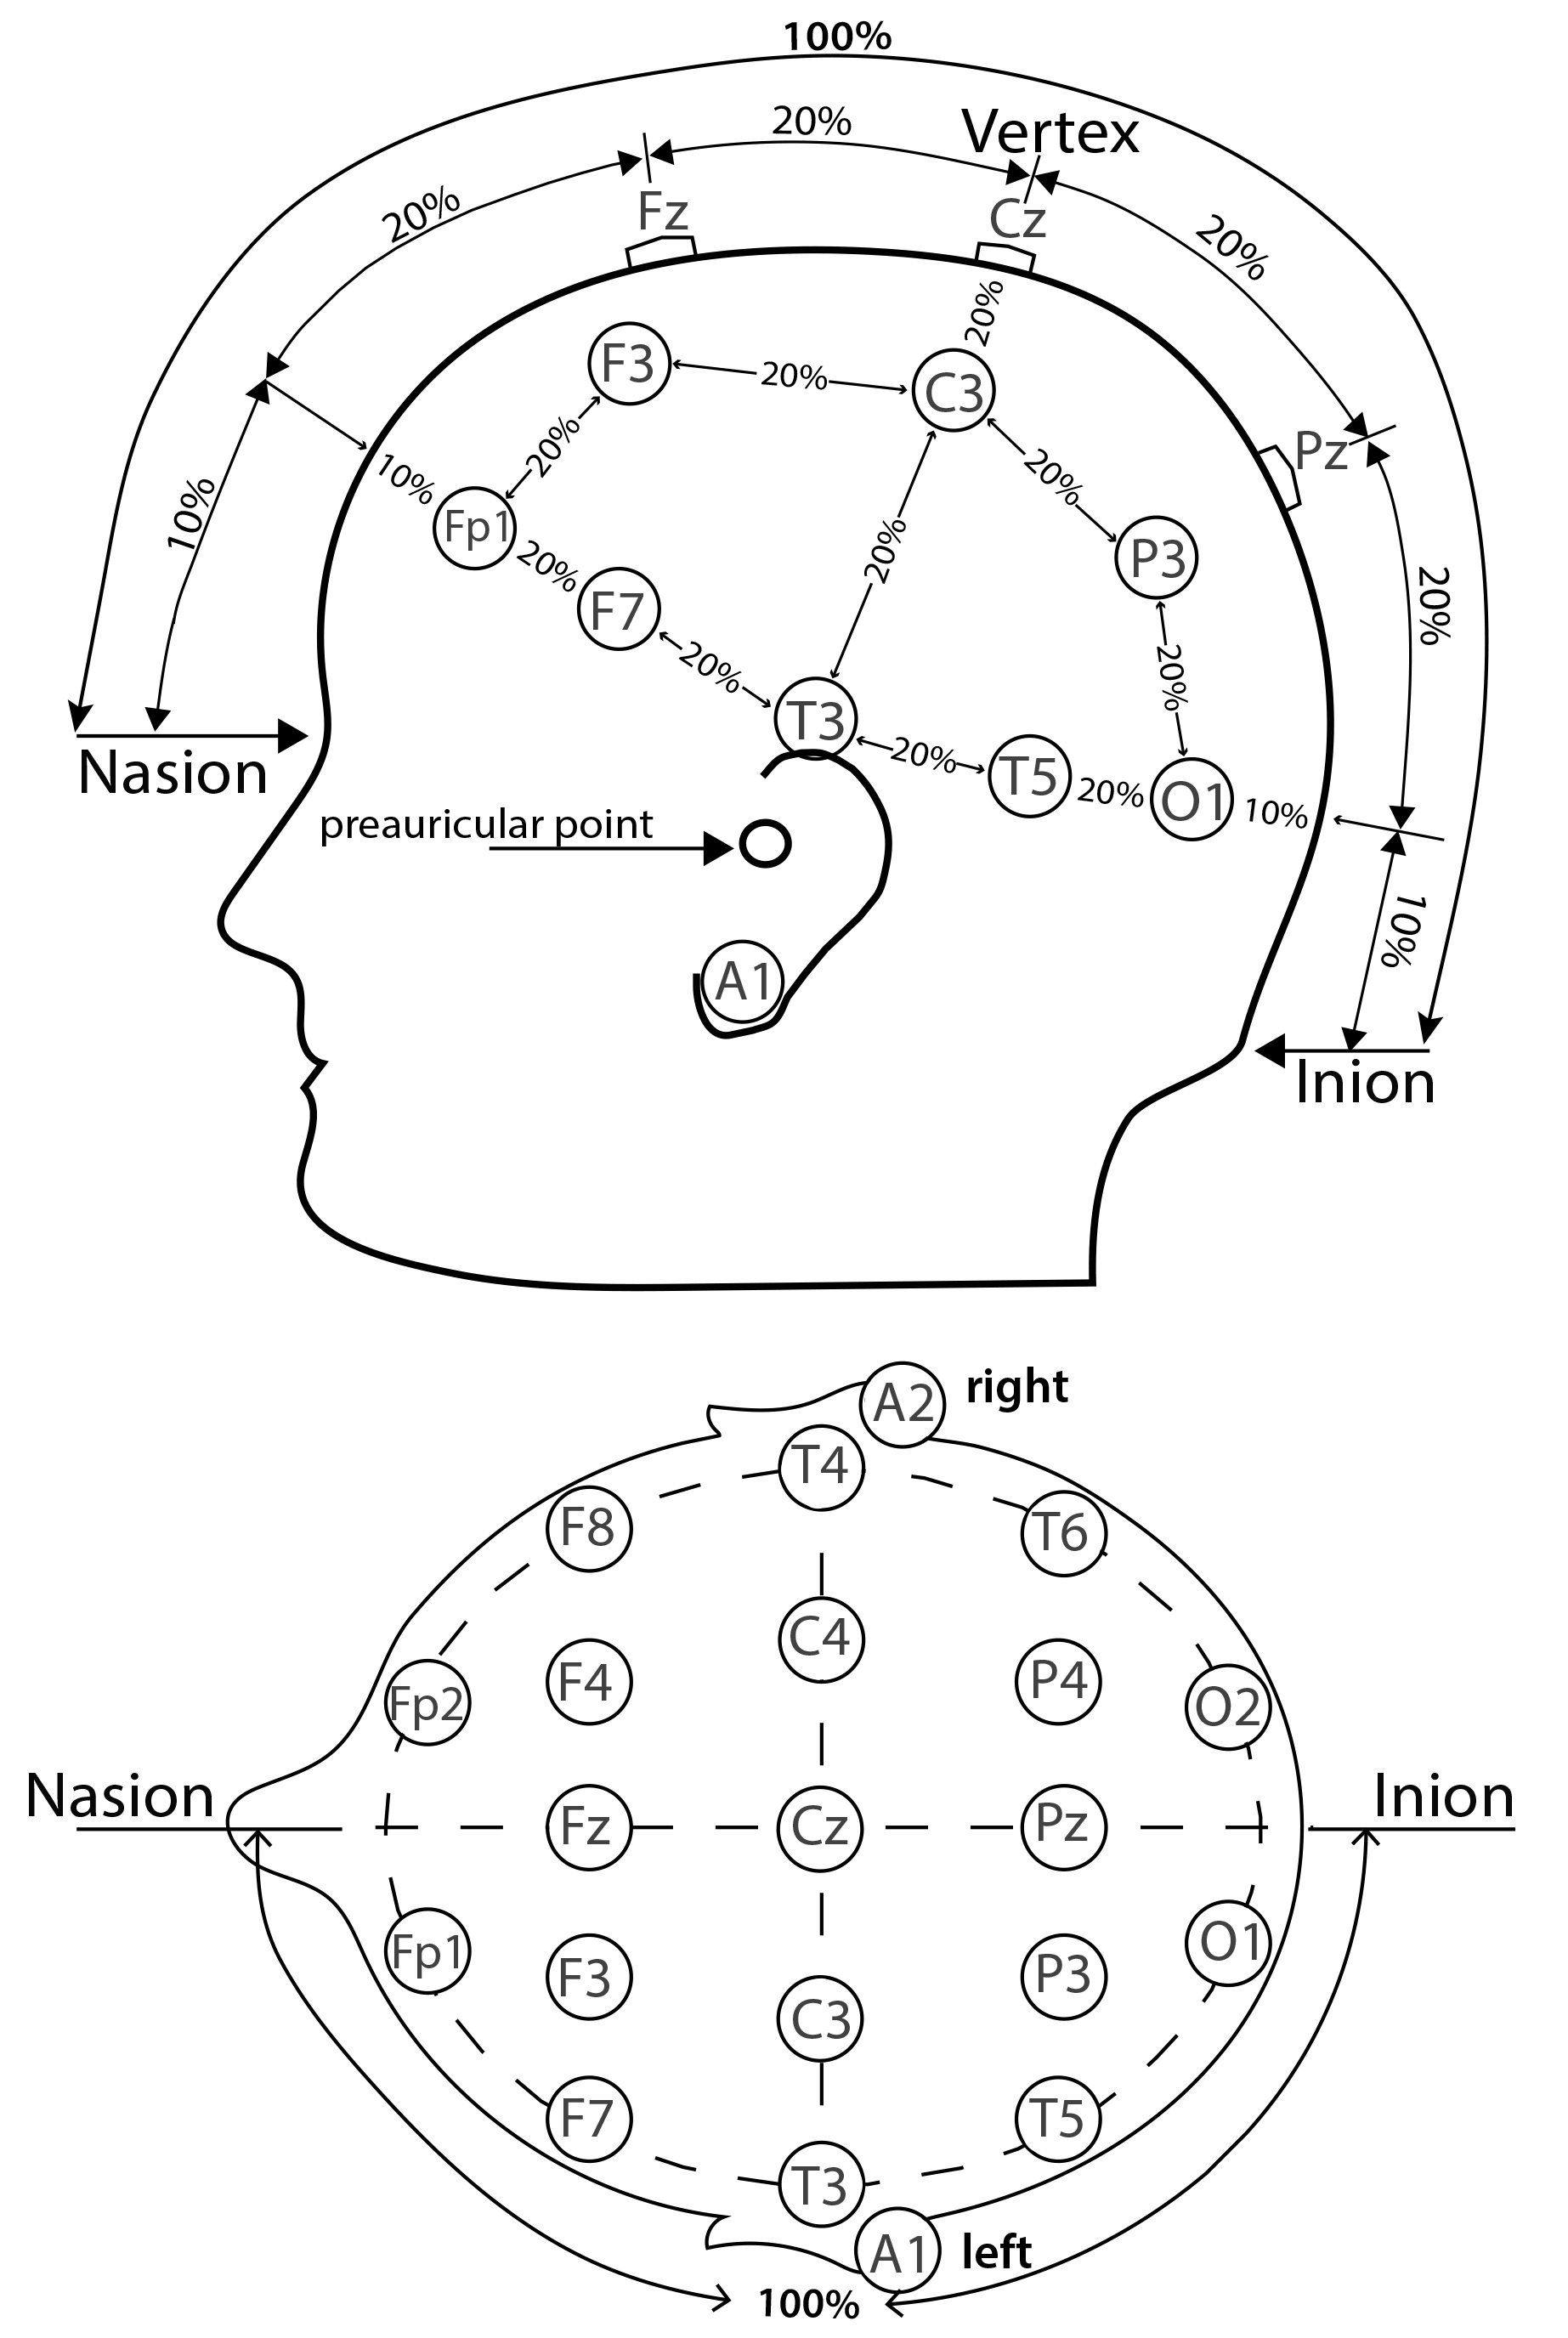
Measuring
Measure Naison to Inion ( centimeters )
around 36 cm
Calculate :
Calculate :
Mark
Measure from Left-Preauricular-Point to Right-Preauricular-Point
be sure to pass tape measure through
around 36.5 cm
Calculate :
Mark
Interaction
Script for Day 1 participants:
Remember, participants will feel more comfortable with you if you explain procedures to them.
(Paperwork should be completed before any procedures start.)
There will be usually two of you in the room when a participant enters. Introduce yourselves and just simply state, “Hello Mr. _, my name is _ and this is _. We will be doing your initial calibration and first treatments today. Before we get started, we will be going over some paperwork that we will be going over for every visit. Please have a seat while I explain the procedures to you.”
(Go over paperwork with them. Most of these will be questions that you will be asking them and recording their answers. You will be exposed to all the paperwork before we even start. Don’t sweat this step.)
(When finished with paperwork.) “Today we are going to start with finding your unique calibration that will be used for the remainder of your treatments. This process will only be for today. Going forward, you can expect each session to be treatments only.”
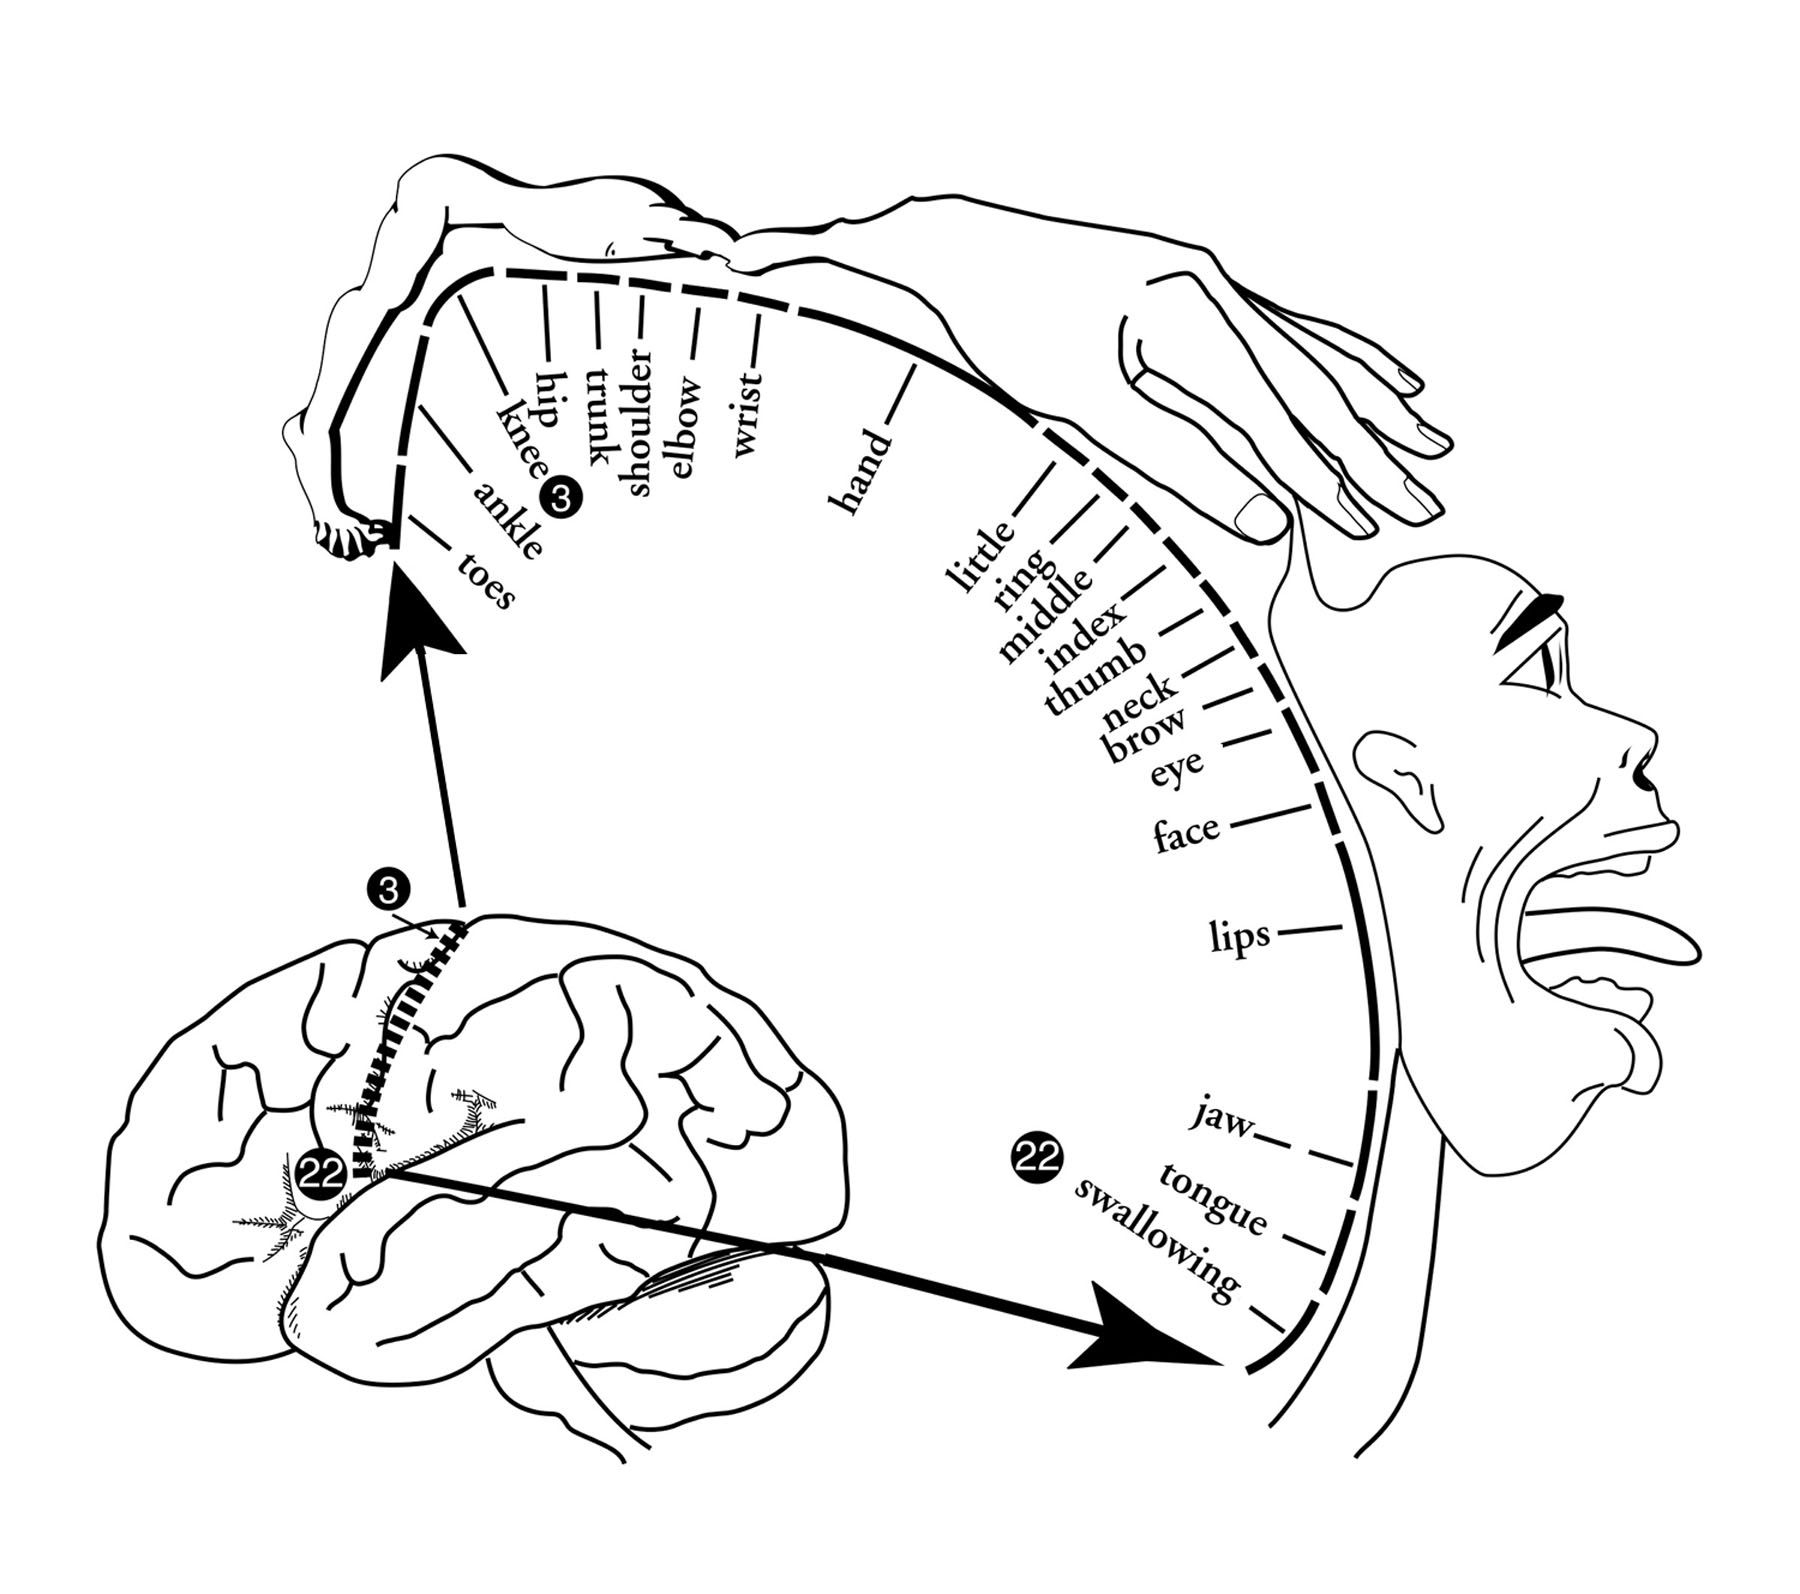
“First, I am going to take some measurements. (Show the participant on yourself) I am going to measure from between the eyebrows to the base of your skull and from ear to ear. These measurements will help me to know where I need to stimulate to find your individual intensity.”
(Take measurements and place stickers)
Motor Threshold
Turn on computer
Turn on water circulation pump ( in the front )
Turn on hardware ( in the back )
Select MeRT 2.0 Clinical Trials App
Login
Select Motor Threshold ( in the top right ) on the software
Press Start
Press On button ( bottom left ) on the hardware
Start at 30% intensity
The blank side of the coil should make contact with the participant's head, the side with the lines is facing you for your reference.
Go back and forth between
diamond pattern
Increase by 5% after each round
don't go above 70%
have patient squeeze fists 3 times , every so often
Once you observe twitch on contralateral side , hold still
Have partner decrease intensity by 1% , until stimulus is gone
Increase back 1% now , and confirm stimulus returns
Interaction
“For this procedure, we need you to remain relaxed. I like to think of the analogy of melting ice cream. Relax into the chair. You can reposition the chair with the remote if you would like. I would also like for you to lay your arms on the arm rests with palms facing up. If it is more comfortable for you to place your hands on your lap, you can do so, but make sure that your palms are facing up. I recommend keeping your eyes closed, however, that is optional. Also, uncross legs for this procedure.”
“You are going to hear some clicking sounds. That is completely normal. I am going to alternate between sides to try to get the most efficient measurement.”
Ok great! We measured your goal intensity. Now onto the treatment.”
Treatment
Calculate :
Calculate :
Position TMS wand overtop of
Explain to the Patient :
relax , stay still
close their eyes each time they hear the bell , but don't fall asleep
they can open between rounds , but once you hear a bell , close again
Press "Confirm and Start"
Increase by 2% every 3-5 trains
Click complete phase
Logout
Interaction
“I am going to place the coil on one of my measurements that I took earlier. We need the coil to make good contact but should not be uncomfortable for you. Treatment is not going to be painful at all. We just ask that you remain comfortable in the chair. During the train pulses, we ask that you keep your eyes closed but stay awake and alert. Treatments will last for about 13 minutes. You will hear a dinging sound a second or two before the treatment is administered. That is just given as a warning the treatment is going to start. When treatment is administered, you will hear a short duration of train pulses. There will be multiple of these throughout the treatment. We are going to start at a lower dosage and work our way up to your individual intensity by the end of the treatment. Your intensity will be given for the remainder of the treatments.”
(Place coil. Make sure there is not too much pressure on their head) “Ok. The coil is in place. We are going to start treatment now. I will let you know every couple of minutes where you are in the treatment process.”
(After treatment) “Alright! We are all finished with the first treatment. This is what you can expect for each subsequent treatment. There is going to be a 30-minute break between treatments each session (Set timer). We ask that you stay in the treatment room. If you need to use the restroom or grab a snack, you are more than welcome.”
*If the participant asks about the curtain, just merely say that this is a controlled trial. We need to protect the validity of the study. You could even be a little lighthearted as well and say something to the effect of “The mad wizard is behind the curtain.” That could ease nerves on the participants’ end.
Electroencephalography
https://neupsykey.com/electroencephalography-general-principles-and-clinical-applications/
https://circuitenginedonned77.z22.web.core.windows.net/basic-eeg-lead-placement-diagram.html
https://edmontonneurotherapy.com/Edmonton_Neurotherapy_QEEG_brain_mapping.html
https://www.sciencedirect.com/science/article/pii/S1878929315000833?via%3Dihub
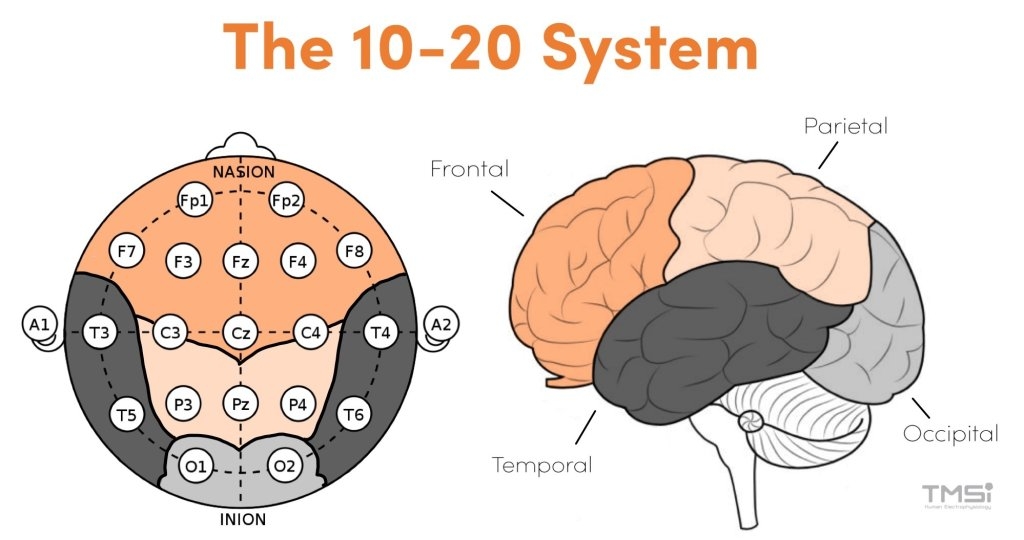
10-20 Positioning ➡️ Brodmann Areas
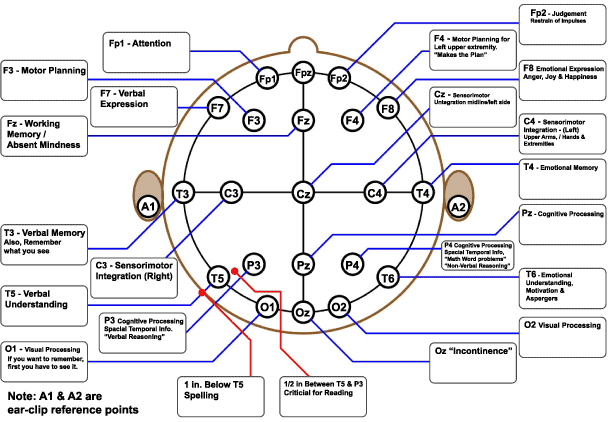
Electrode Placement
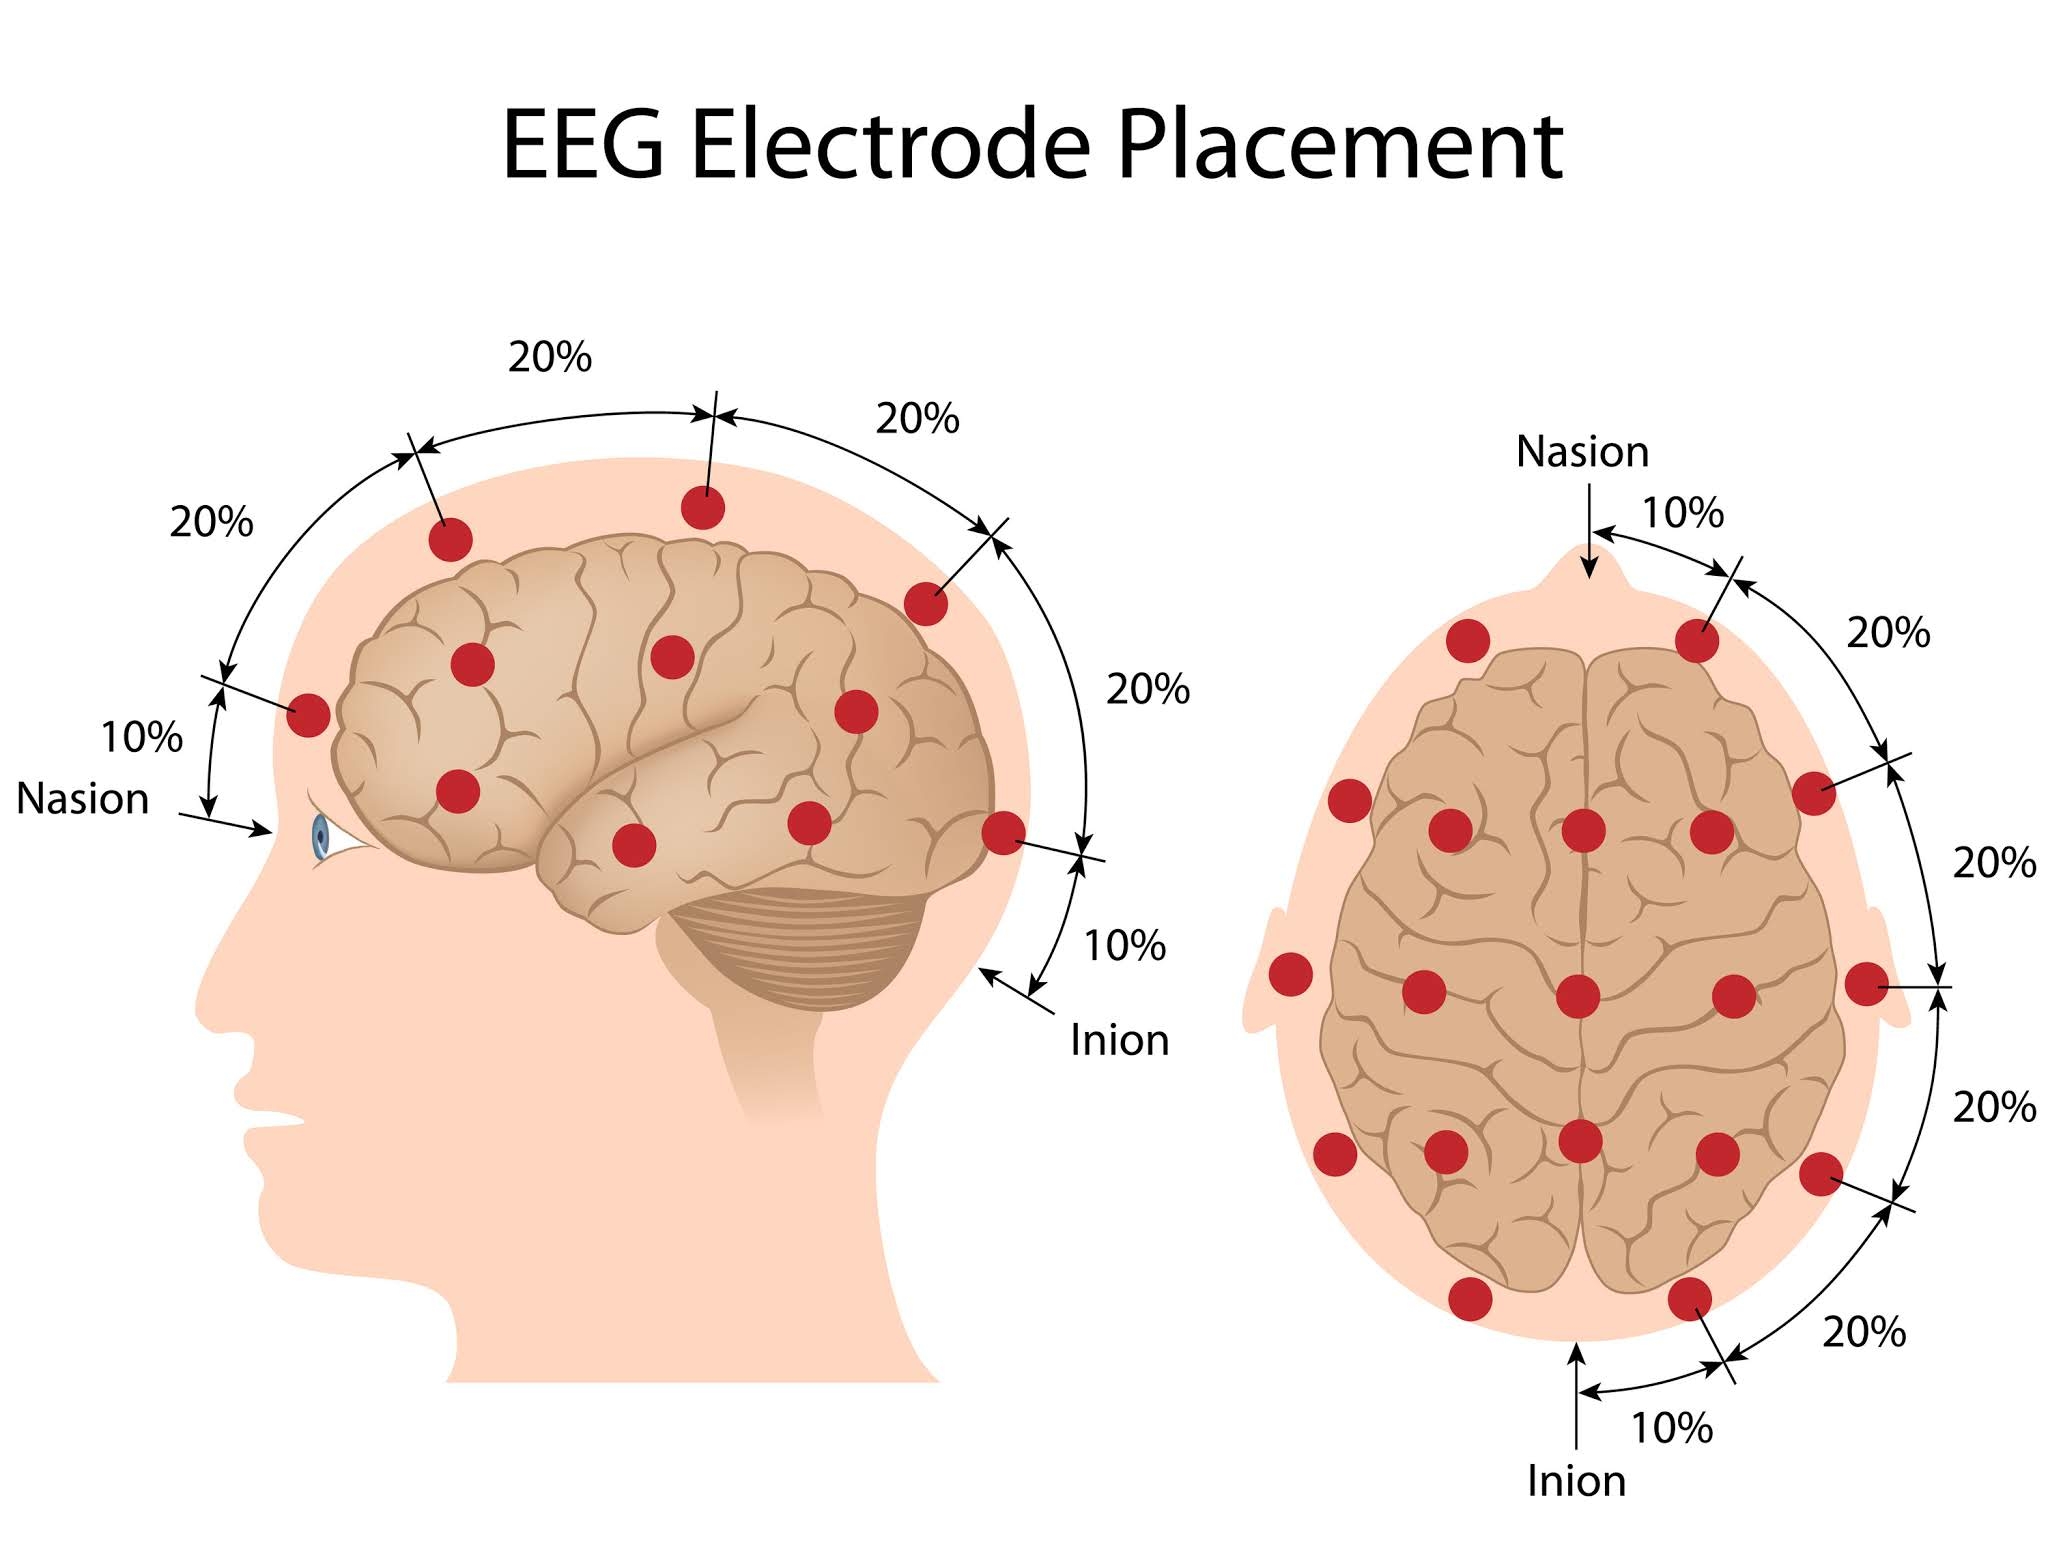
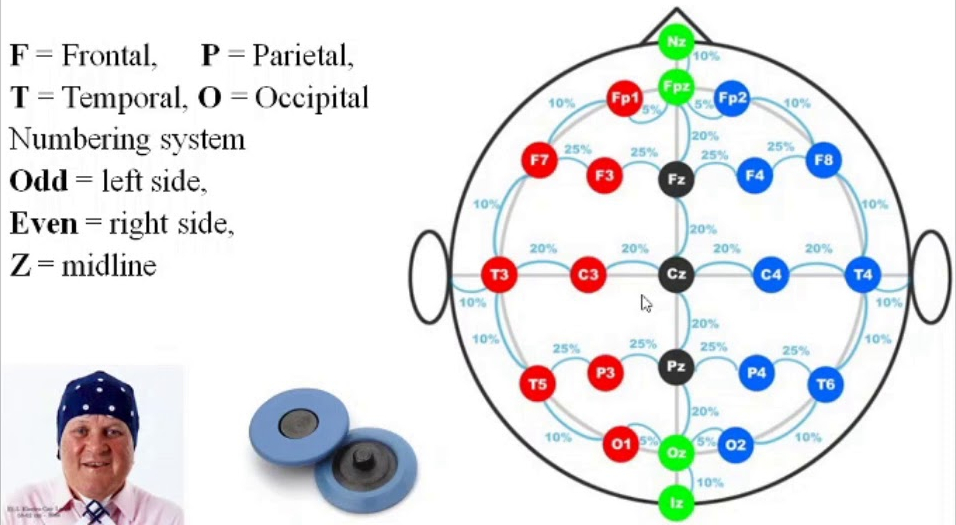
To record somatosensory-evoked potential data during monitoring, subdermal needle electrodes are inserted into the scalp. To acquire motor-evoked potentials, stimulating subdermal or corkscrew needle electrodes must be inserted into the scalp. The International EEG 10/20 Electrode Placement System is referenced below for needle locations. For monitoring purposes, a total of nine electrodes may be used. Six electrodes are used for recording, two electrodes are used for stimulating, and one electrode is used as a ground and may be placed in the scalp (cephalic) or on the shoulder (noncephalic). A grounding pad may be used in lieu of a needle.
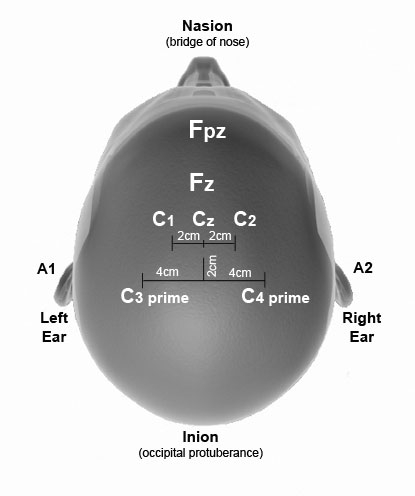
The reference points and placement of the electrodes in the average adult are as follows and as depicted in the diagram below :
| Reference Point | Electrode Type | Location |
|---|---|---|
| Fpz | Recording | 10% of the distance from the bridge of the nose (nasion) to the bony knob (occipital protuberance or inion) in the back of the head |
| Fz | Cephalic ground | Generally between Fpz and Cz |
| Cz | Recording | 50% of the distance between the nasion and the inion |
| C1 | Stimulating | 10% of the distance left lateral from Cz or 2 centimeters (cm) left of Cz |
| C2 | Stimulating | 10% of the distance right lateral from Cz or 2 cm right of Cz |
| C3 prime | Recording | 20% of the distance left lateral from Cz and 2 cm posterior to Cz or 2 cm posterior and 4 cm left lateral to Cz |
| C4 prime | Recording | 20% of the distance right lateral from Cz and 2 cm posterior to Cz or 2 cm posterior and 4 cm right lateral to Cz |
| A1 | Recording | Left ear lobe or mastoid process (bone behind ear) |
| A2 | Recording | Recording Right ear lobe or mastoid process (bone behind ear) |
Additional subdermal needle recording electrodes are inserted in the interspinous spaces between C5-C6 (median nerve) and C7-T1 (ulnar nerve). These locations (not diagramed) represent the root entry zone (median and ulnar nerve origin) to acquire subcortical data. Subcortical data are valuable in evaluating peripheral and central conduction.